Wednesday, April 28, 2010

Chipotle Chicken Quesadillas

Contest: Cinco de Mayo Recipe Challenge on Mixingbowl.com - entered by me

This is my ultimate "Go-To" recipe. Quesadillas are the top of the rotation list. When I moved to New England from Texas one of the things I missed most was good Tex Mex food. The first few years I was here everyone I met would insist on dragging me to all the "great Mexican places" in the greater Boston area. It became uncomfortable for all involved. My friends would be so excited and proud to bring me to a great restaurant only for me to be disappointed and horrified at what these restaurants call Mexican food. I realized my friends, who I feel are smart people with good taste, had no idea what good Mexican food was. There is a restaurant up here that combines Cajun and Tex Mex. You get dirty rice with your enchiladas. It is so wrong and no one up here knows it is wrong. This became all too much for me to handle, so I finally gave up, stopped trying the "great new Mexican places" and started cooking my own Tex Mex. I made quesadillas a few times for friends and now it is all people want me to make. I get bored with my original recipe so I change it up often with whatever is in the fridge. The best was a lobster quesadilla with Havarti cheese and corn. Yum! We made them last summer on the last day of our Cape vacation, it was all the stuff we were going to throw out of the fridge before giving up the rental. I just started playing with the Chipotle peppers and have been loving them! I entered the Mixing Bowl contests with this Chipotle recipe, the peppers are a great addition to my basic quesadilla.

Variations:
Remove the chipotle, add any of the following: fresh cilantro, red bell peppers, corn, black beans, and use any kind of cheese you like. I often use cheddar. I have made veggie quesadillas with mozzarella cheese and fresh summer squash. You can really put anything between two tortillas and as long as there is enough cheese to hold it together, it is a quesadilla. Clean out the fridge!

Chipotle Chicken Quesadillas

Ingredients:
1 tablespoon olive oil
1 medium onion roughly chopped
1 4oz can diced green chilies
2 boneless chicken breast cut into bite size pieces
1 teaspoon chili powder
1/2 teaspoon ground cumin powder
1 tablespoon chipolte peppers in adobo sauce
8 oz shredded Monterrey jack cheese
salt and cayenne pepper to taste
8 medium four tortillas
1-3 tablespoons olive oil for grilling
Directions:
Heat one tablespoon of olive oil in a skillet, add onions and chilies, cook until the onions are soft. Add chicken and brown the chicken with the onions and chilies. Add chili powder, cumin and chipotle pepper in the last few minutes of cooking. Salt and pepper to taste. Remove skillet from heat.

On large work surface, place 4 flout tortillas and evenly divide the chicken mixture over the 4 tortillas. Spread the chicken evenly over each tortilla. Top chicken with shredded Monterrey jack cheese and top with a tortilla. Heat a large flat skillet with oil. Place one quesadilla at a time on the hot skillet, grill 2-3 minutes each side till golden brown and the cheese inside is melted to seal the quesadillas. Slice into 4 quarters with a pizza cutter, serve warm with a side of sour cream and salsa.

This is a really unappealing picture of my beautiful quesadillas. I'll have to take a better picture next time I make them.

Tuesday, April 27, 2010

Spinach Stuffed Prom Chicken

Contest: Cooking Light - Ultimate Reader Recipe Challenge - submitted by me

In the hotel business any stuffed baked chicken breast is simply called "Prom Chicken". It is the cheapest chicken dish on a banquet menu, it is the chicken option at every banquet event you ever attended, and you definitely had it at your prom. There are so many variations of Prom Chicken since you can stuff a chicken with so many things. If it is rolled up into that little breaded pod it is Prom Chicken. The versatility makes the classic Prom Chicken recipe an ideal entry into recipe contests. I entered this Spinach Stuffed Prom Chicken in a Cooking Light contest. Using the sponsors products was not hard, but calling it healthy might a challenge. The rules of this contest state the recipe must meet the health requirements set by Cooking Light. I am not skilled at calculating the fat, calories or general nutrition for a recipe and I am not naturally a healthy cook. Who knows if this recipe will even qualify, but it is a good recipe just the same. The three year old loved it and asked for more which only proves - you can never go wrong with the Prom Chicken!

I forgot to take a picture of this one. :-( Rest assured there will be other Prom Chickens and I will get a good picture in the future.

Spinach Stuffed Baked Chicken Breast

Ingredients
1 Tablespoon Olive Oil
1 Clove Garlic - crushed
1 lb Fresh Spinach
2 Boneless and Skinless Chicken Breast
1 Tablespoon Sargento Reduced Sodium Provolone Cheese
1 Tablespoon Sargento Reduced Sodium Mozzarella Cheese
1 Tablespoon McCormick Perfect Pinch Italian Seasoning
1 Egg-Land's Best Egg
2 Tablespoons Flour
2 Tablespoons Panko Bread Crumbs

Preheat oven to 30 degrees.
Heat 1 tablespoon olive oil in skillet over medium heat. Add garlic and cook for 1-2 minutes until fragrant. Add fresh spinach and toss with oil/garlic. Continue tossing until spinach is wilted, approximately 5 minutes. Remove spinach from heat.
Pound chicken breast between two sheets of plastic wrap to about 1/4 inch thick flat pieces. Season each chicken breast with McCormick Perfect Pinch Italian Seasoning, then top each chicken breast with Sargento Reduced Sodium Provolone and Mozzarella cheeses. Drain and squeeze dry the spinach. Place approximately 2 -3 tablespoons of spinach down the center of each chicken breast. Roll up both chicken breast and pin with toothpicks to create a sealed chicken roll.
Prepare a plate of flour, bowl with beaten Egg-Land's Best Egg and separate dish with Panko bread crumbs. Roll and dust each chicken roll in flour, then dredge in egg and roll in Panko. Place both complete chicken rolls in a 8X8 inch baking dish and bake at 350 for approximately 20-30 minutes.

Wednesday, April 14, 2010

The Million Dollar Ice Cream Cup

I called it!! The Mini Ice Cream Cup won! Sue Compton from New Jersey was awarded the million dollar top prize in this year's Pillsbury Bake Off. Did I mention it was my pick? And that I had a similar idea? He he. I have been so anxiously awaiting the results, you would think I was in the contest. I had so much fun trying the recipes and following the contest. I can't even imagine how crazy nervous I would be if I were a participant. One day maybe I'll know. Time for me to get off the sidelines and start participating and winning some fun contests. There are some great contests running right now, I need to get in the game. Hope to share some success soon!

I haven't watched the Oprah show yet, taped it on the DVR. Saw the announcement on the Pillsbury site:
http://content.mkt931.com/mson/2010/04/14/KIjLuX8nvJOL/index.htmlry site.

I still have a few Mini Ice Cream Cups in my freezer from yesterday, think I'll have one to celebrate Ms. Compton's win. Congratulations Sue, you did it, you won the grand daddy of all contests!!

Tuesday, April 13, 2010

Salmon Pecan-Crusted Tartlets

Pillsbury 44th Bake Off Category Winner Entertaining Appetizers - Evelyn Henderson's Salmon Pecan-Crusted Tartlets

My husband is putting his money on this one. It is a tough call but, I am going with the Ice Cream Cups. I didn't get to make the Tomato Basil Eggs Alfredo today. I hope to tomorrow morning, but honestly don't have time. I need to pack up 2 boys to meet a friend for a big zoo outing in the morning. Not sure I can pull off a big homemade breakfast with a zoo trip.

This recipe is delicious! They melt in your mouth. The pecans in the crust sounded cooler than they turned out in my opinion. I only put pecans in half, again because of our nut allergy. There isn't much to say about this recipe, maybe that is the sign of a winner. It was easy to make and really great. Can't wait to see who wins on Oprah tomorrow!!!

Salmon Pecan-Crusted Tartlets

INGREDIENTS
1can (6 oz) premium skinless boneless pink salmon, drained
1/4cup finely chopped dill pickle
1tablespoon finely chopped onion
1/3cup mayonnaise or salad dressing
1/2cup shredded mild Cheddar cheese (2 oz)
1tablespoon lemon juice
1/2teaspoon dried dill weed
1box Pillsbury® refrigerated pie crusts, softened as directed on box
1/3cup Fisher® Chef’s Naturals® Pecan Cookie Pieces or Fisher® Chef’s Naturals® Chopped Pecans, finely chopped
1package (3 oz) cream cheese, softened
1dill weed sprig
2lemon wedges

DIRECTIONS
1.In large bowl, mix salmon, pickle, onion, mayonnaise, cheese, lemon juice and 1/2 teaspoon dill weed. Refrigerate.
2.Heat oven to 400°F. On work surface, unroll 1 pie crust. Sprinkle half of the pecans over crust; gently press into crust. Cut with 3-inch round cookie cutter into 10 rounds. In ungreased nonstick mini muffin pan, gently press each round, pecan side down, on bottom and up side of muffin cup, folding edge under and rounding to shape. Repeat with remaining crust.
3.Spoon 1 teaspoon of the cream cheese into bottom of each cup. Spoon 1 rounded tablespoon salmon mixture on cream cheese in each cup.
4.Bake 12 to 18 minutes or until crust is golden brown. Cool in pan on cooling rack 5 minutes. Remove from pan to serving platter; cool 5 minutes. Garnish with dill weed sprig and lemon wedges. Serve warm.


Mini Ice Cream Cookie Cups

Contest: 44th Pillsbury Bake Off Category Winner, Sweet Treats - Sue Compton for Mini Ice Cream Cookie Cups

This recipe was very interesting to me and I can't believe I did not make it till today. I am NOT saying this is my idea.... but I had an idea similar that was going to be one of my Pillsbury entries once I figured out the logistics. My idea was to roll out a tube of sugar cookie dough then either bake it on or in a dome bowl or a bundt pan creating a "cookie bowl." This cookie bowl then could be used to make an ice cream bomb cake or a trifle. I did not figure on the dough melting off the pan into a pool of yuck. See below.


My failure has created a bit of unearned pride or support for this recipe. In no way would this recipe winning be like me winning, but it would validate to me that I was at least on the right track of thinking. Enough about me, how about we talk about someone that has a chance of winning!

I love this recipe! It is easy and very versatile. I did not make mine with the exact ingredients. There were no fresh raspberries today at the store and I really thought I had raspberry jam in the fridge, turns out I only had strawberry. So I used strawberry jam and blueberries on top. I only put nuts on half the cups, we have a nut allergy in the house and I don't trust the non-allergy kid to eat nuts because he can make a mess. Once I started filling the cups with ice cream I got off course; pulled out the chocolate ice cream, chocolate chips, jimmies (sprinkles) and was disappointed that I couldn't find M&Ms (guess I ate them).

This recipe has to have an excellent chance because it is simple, good and can be easily changed to meet anyone's taste. This is my vote for the million!

Mini Ice Cream Cookie Cups

INGREDIENTS
1package (16 oz) Pillsbury® Ready to Bake!™ refrigerated sugar cookies (24 cookies)
4teaspoons sugar
1/3cup Fisher® Chef’s Naturals® Chopped Walnuts, finely chopped
1/2cup Hershey’s® semi-sweet chocolate baking chips
1/4cup Smucker’s® Seedless Red Raspberry Jam
1 1/2cups vanilla bean ice cream, softened
24fresh raspberries

DIRECTIONS
1.Heat oven to 350°F. Spray 24 mini muffin cups with Crisco® Original No-Stick Cooking Spray. Place 1 cookie dough round in each muffin cup. Bake 15 to 20 minutes or until golden brown.
2.Place 2 teaspoons of the sugar in small bowl. Dip end of wooden spoon handle in sugar; carefully press into center of each cookie to make 1-inch-wide indentation. Cool completely in pan, about 20 minutes.
3.Meanwhile, in small bowl, mix walnuts and remaining 2 teaspoons sugar; set aside. In small microwavable bowl, microwave chocolate chips uncovered on High 30 to 60 seconds, stirring after 30 seconds, until smooth.
4.Run knife around edges of cups to loosen; gently remove from pan. Dip rim of each cup into melted chocolate, then into walnut mixture. Place walnut side up on cookie sheet with sides.
5.In another small microwavable bowl, microwave jam uncovered on High about 15 seconds until melted. Spoon 1/2 teaspoon jam into each cup. Freeze cups about 5 minutes or until chocolate is set.
6.Spoon ice cream into cups, using small cookie scoop or measuring tablespoon. Top each cup with fresh raspberry. Store in freezer; let stand at room temperature 5 minutes before serving.
Very impressive little treats!


I got carried away and made several varieties. These would be so fun at a birthday party!

Zesty Lime-Fish Tacos

44th Pillsbury Bake Off Category Winner Winner of Dinner Made Easy Category - Kellie White's Zesty Lime-Fish Tacos

I am not sure how this made the final four. It is ok, but I just don't see a million dollars. Making tortillas out of biscuits was very creative, time consuming, but creative. It didn't really make a tortilla but more like a gyro bread. This bread product would have been better paired with chicken kabobs and feta to make a Greek style gyro then a taco. This was my first time using chipotle chiles in adobe sauce; what a powerful, flavorful little can of POW! These chiles will be making a come back in other recipes in my future.

I have been a bit out of control today. I did pull of making 3 of the 4 final recipes. Hope to post the results for all.

Zesty Lime-Fish Tacos

INGREDIENTS
1lb tilapia fillets (about 4)
1/2cup fresh lime juice (2 to 3 limes)
3cloves garlic, finely chopped
1/4cup Pillsbury BEST® All Purpose Flour
1/4cup yellow cornmeal
1can (16.3 oz) Pillsbury® Grands!® Homestyle refrigerated buttermilk biscuits (8 biscuits)
6tablespoons Crisco® Pure Canola Oil
1 1/2tablespoons chipotle chiles in adobo sauce (from 7-oz can), finely chopped
1/2teaspoon salt
1/4teaspoon pepper
1/2cup salsa
1/2cup sour cream
1 1/2cups shredded cabbage

DIRECTIONS
1.Heat oven to 200°F. Cut each fish fillet lengthwise into 4 strips. In shallow glass dish, mix 7 tablespoons of the lime juice and garlic. Add fish; turn to coat. Let stand while preparing biscuits.
2.On work surface, mix flour and cornmeal. Separate dough into 8 biscuits. Press both sides of each biscuit into flour mixture, then press or roll into 6- to 7-inch round.
3.In 12-inch nonstick skillet, heat 1 1/2 tablespoons of the oil over medium heat. Add 2 biscuit rounds; cook about 1 minute on each side or until golden brown and cooked through. Place on cookie sheet; keep warm in oven. Cook remaining rounds, adding 1 1/2 tablespoons oil to skillet for each batch. Wipe skillet clean.
4.Heat same skillet over medium-high heat. Add fish and lime juice mixture, chiles, salt and pepper; cook about 5 minutes, turning fish once, until fish flakes easily with fork.
5.In small bowl, mix salsa, sour cream and remaining 1 tablespoon lime juice.
6.Using slotted spoon, remove fish and divide evenly among biscuit rounds. Top each with cabbage and 1 to 2 tablespoons salsa mixture. Fold biscuit rounds in half over filling. Serve with any remaining salsa mixture. Garnish with lime wedges, if desired.

I want to find the winner before Oprah does!

Pillsbury Bake Off Top 4 Finalist were announced! The 44th Annual Pillsbury Bake Off is in full swing right now. Today they announced the winners of each of the 4 categories: Breakfast & Brunch, Entertaining Appetizers, Dinner Made Easy and Sweet Treats. They judge the final four today and the winner will be announced to the public tomorrow on Oprah! It is a crazy dream of mine to one day do something so significant or interesting as to be a guest on Oprah. Imagine how cool it would be to hear her scream your name. One lucky recipe maker will hear it tomorrow, let's make the meals and live vicariously through this lucky winner!

I tried 10 recipes from the top 100, none the ones I tried were the top winners. I want to be "in the know" on something before Oprah. I am going to try to make all 4 tonight for dinner, aggressive goal. Off to the grocery store!

View the Winning Finalist Recipes on the Pillsbury site:
http://www.pillsbury.com/bakeoff/winners.htm?WT.ac=BakeOff_LandingPage_CategoryWinnersMiddlePromo

Sunday, April 11, 2010

Caprese Pesto Margherita Stackers


Contest: 44th Pillsbury Bake Off Top 100 Finalist - entered by Julie Bedwith

I brought these little bites to Girls Night Out (GNO) this past Saturday. There are six of us in the GNO group and we have been taking turns hosting dinner every month for the past eight years. Usually the host makes dinner and the other girls all bring something. Of the six of us, there are four that have ties to the old country. Real Italians. So when it is my turn to host or bring something I never make anything slightly Italian as I am way too intimidated. I forgot this rule as I started making this little Italian appetizer. Luckily, the girls loved it. Might not by from the Old Country, but it was a hit. I think I have taken the whole "don't cook Italian for Italians" too seriously, turns out if you put a tomato and basil on anything they'll eat it. Love when they host, these ladies really know how to cook!

When making this I grew a greater appreciation for the Pillsbury bread stick product. Many of the finalist recipes require you to wrap dough around something, the crescent and biscuit doughs are really soft and hard to wrap. Bread stick dough is elastic like pizza dough, much easier to stretch around a ball... or so I thought! Turns out the cheese still found an escape on many of their crusts. The results did not look like the picture on the Pillsbury website. Just eating the little ball out of the oven was not too impressive, the basil and tomato really make the bite. Good recipe!

Caprese Pesto Margherita Stackers by Julie Bedwith
INGREDIENTS
1container (8 oz) fresh mozzarella ciliegine cheese (24 cherry-size balls)
1can (11 oz) Pillsbury® refrigerated original breadsticks (12 breadsticks)
3tablespoons basil pesto
1tablespoon Crisco® 100% Extra Virgin Olive Oil or Pure Olive Oil
2tablespoons grated Parmesan cheese
24frilled toothpicks
24grape tomatoes
24fresh basil leaves
DIRECTIONS
1.Heat oven to 375°F. Spray 24 mini muffin cups with Crisco® Original No-Stick Cooking Spray. Drain cheese balls; pat dry with paper towels.
2.On work surface, unroll dough; separate into 12 breadsticks. Cut each breadstick in half crosswise; press each half into 3x2-inch rectangle.
3.Spread rounded 1/4 teaspoon of the pesto lengthwise down center of each dough rectangle. Place 1 cheese ball on each rectangle. Carefully stretch dough around cheese; pinch edges to seal completely. Place seam sides down in muffin cups. Brush with oil; sprinkle with Parmesan cheese.
4.Bake 14 to 20 minutes or until deep golden brown. Cool in pan 5 minutes. Remove from pan. With each toothpick, spear tomato and basil leaf; insert into cheese ball. Serve warm.


They are pretty little appetizers. Very impressive looking and taste great too!


This is my cheese problem. But it was also kind of cool looking, just not how they are suppose to look.

Sunday, April 4, 2010

A&E - Sell This House! - After

WOW! It feels very drastic to us. I asked if they did more or spent more than normal at our house, they said no, it just feels that way because it is your house. But it really does feel like a bigger before/after than I have seen on the show. I think pictures don't do it justice. It will be interesting to see how it looks on the show. We don't see the show at all until it is on TV on June 26th. So I have no idea how many of the scenes we did will make it or what it will look like. They take an average of 12 hours of film to make a 26 minute episode. It was a wild experience, we loved it!

They did 4 rooms in our house and a bonus room sort of by painting our kitchen, so it is like we got 5 rooms.

Dining Room - 1st Floor

New paint, new window treatments, recovered the chairs and new light fixture. They moved my dresser out of our room into the dining room! At first I was sort of freaked out by that, imagining getting dressed each morning in the dining room, but I found ways to keep my clothes on the 2nd floor. They scattered apples in an artistic way for the showing. It looks cool! Glued my chairs back together and recovered them, yea! We love how this room came out.


Kitchen - 1st floor


Our real estate agent has better pictures of the kitchen. All they did was paint it, but wow it makes such a difference. We added the granite right before the show, it looks so good with the slate gray walls. Who would have thought to paint the kitchen such a dark color!?! I was pretty nervous as they rolled it, but it looks amazing! Peeking through the window from the living room the colors go so well together. The green and gray are beautiful compliments.

Living Room - 1st Floor


Gray accent wall, new window treatments, new light fixture, new book shelf, rugs and throw pillows. The dark gray wall with the TV on it creates a home theater feel. It is very nice. I love our leather sofas. When we bought them I was drawn to them because they have great clean lines and looked very sophisticated. We put them in our living room and they looked like dumpy brown sofas. Crazy how the new colors and new arrangement has made the sofas look rich and impressive again. They saved the toy box, it is full but closes. The boys don't seem to miss much, they actually run around the house and play together more now that there are not as many toys.

Master Bedroom - 2nd Floor


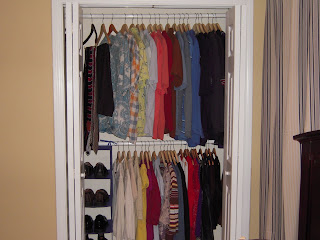
Didn't paint. New light fixture, curtains, blinds, bedding and hangars. It looks like a hotel room! So inviting. I do miss my dresser, but the room feel so much larger without it. They put a curtain across the whole wall covering the window to create a flat wall for the bed. The closet is sort of a trick, good for selling the house, but not a real solution for everyday. We took out more than half our clothes then they put a few pieces on wooden hangars. With so few hangars the doors move them sideways and will now shut. It looks cool, but I have more than 20 shirts. Good tip for selling, but not for living. I learned how to make the bed like that too.

3rd Floor Bedroom


Paint, new shelves, boxes, desk, light fixture, throw pillows, futon cover and blinds. It is now an office! They made a good point, with so many rooms we did not show an office option. We had an office, but it turned into a little boy room and we just did without. This looks so big now! I love how they used a deep blue on the walls and included the slant in the ceiling. We were always confused on how to best paint these rooms. We painted it all one color, ceiling too. Kept the futon too, so we can still have guests.

Storage and the aftermath

We have a very full storage unit now. It has our piano, full size bed, end table, and lots of boxes of random stuff. The second day Chad, the assistant designer, told me we would hate them all by the end of the day. He said it is so crazy hectic and twice as stressful as moving day because it all happens so fast. We did not hate them, but the house was a disaster after the 2nd day. We planned on staying here but we could not get to the kids beds. Went to a hotel. The rooms that were not in the show, kitchen, the boys rooms and our upstairs bathroom, got filled with stuff that need sorted and became work rooms. Chad set up shop with the ironing board and curtains in the nursery. Also all the clothes from my dresser ended up in the bathtub till I could figure out a way to keep them on the 2nd floor, not in the dining room. Here are some pictures of the chaos.


I should have taken more pictures to remember the experience, but there was just too much going on to keep up. We didn't even get a picture with Roger and Tanya. I suppose we get a whole episode, that should be enough. Our episode is June 26th.

Our real estate agent's site has some good before/after pics, take a look: http://www.nancymsullivan.com/index.html

Fudgy Chocolate Chip-Toffee Bars

Contest: 44th Pillsbury Bake Off Top 100 Finalist - entered by Sarah Fuchs

I have been totally out of control this week with baking. Made way too many sweets, then topped the week off with Easter baskets full of candy. We will all have to detox next week, no sugar - only green things. The weather has officially turned to Spring so we will be grilling up a storm this week Had a small cookout on Saturday and I made this for dessert. Big hit!

This is a very rich and decedant bar, but it seemed like something I have had before. My mother-in-law lives in a small town in Nova Scotia and the people there really know "bars" and "squares". I think this recipe just seems like something we would eat in Nova Scotia. They make a great square up there with Skor Bar pieces and Ritz Crackers, I'll have to share that one someday. One of my favorite cook books is What's Cooking Havre Boucher, it is the local community cook book from my MIL's town. Half the book is desserts and they are mostly squares. Community cook books are one of my favorite things, that is where you get real dishes and great desserts. This is my husband's vote for the million and I have to agree that this has to have a good shot at the big prize. I will make this again.

Fudgy Chocolate Chip-Toffee Bars by Sarah Fuchs

INGREDIENTS
1/2cup LAND O LAKES® Butter, melted
2cups graham cracker crumbs (32 squares)
1bag (8 oz) Heath® Bits 'O Brickle® toffee bits (1 1/2 cups)
1roll (16.5 oz) Pillsbury® refrigerated chocolate chip cookies
1bag (12 oz) Hershey’s® semi-sweet chocolate baking chips (2 cups)
1can (14 oz) Eagle Brand® Sweetened Condensed Milk
1tablespoon LAND O LAKES® Butter
1teaspoon vanilla

DIRECTIONS
1.Heat oven to 350°F (325°F for dark or nonstick pan). Spray bottom only of 13x9-inch pan with Crisco® Original No-Stick Cooking Spray.
2.In medium bowl, stir 1/2 cup melted butter, 1 1/2 cups of the cracker crumbs and 3/4 cup of the toffee bits. Press mixture evenly in bottom of pan. Refrigerate about 15 minutes or until firm.
3.Meanwhile, let cookie dough stand at room temperature 10 minutes to soften. In 2-quart saucepan, heat chocolate chips, milk and 1 tablespoon butter over medium heat, stirring frequently, until chips are melted and mixture is smooth. Remove from heat; stir in vanilla. Spread mixture over cracker crust.
4.In medium bowl, break up cookie dough. Mix in remaining 1/2 cup cracker crumbs with wooden spoon until well blended. Crumble mixture evenly over chocolate layer. Sprinkle with remaining 3/4 cup toffee bits.
5.Bake 25 to 35 minutes or until golden brown. Cool completely, about 2 hours. For a firmer bar, refrigerate 30 minutes longer. For bars, cut into 8 rows by 4 rows.


The Easter Bunny got to sample this recipe. We left him a few bars with his carrots, figure even a bunny likes something sweeter than a carrot every now and then.

A&E - Sell This House! - Before

I started this post the weekend before the Sell This House crew arrived to film our episode. Just getting around to posting it now. Funny how crazy my mind was racing before they got here. Everyone was speculating what they were going to do. Working on the after post, it is coming very soon.

BEFORE

Sell This House from A&E start filming tomorrow. Yikes! Just to make our lives that much more difficult, we decided to have granite installed in the kitchen the day before the show shoots. This is our project, not the show. So with less than 24 hours from camera time, the kitchen whole 1st floor is a disaster.

I have been cleaning like a freak since we found out we are on the show. They don't want us to change the rooms or our clutter, but I can make it clean. My husband is getting a bit carried away and I am afraid he is going to hide all our clutter before they get here. He is going to get us in trouble!

The House

It is actually a condo. We own the right side. We bought it as a two family with some friends then had it split into two equal condos. The plan was to flip them and use this purchase as a starter home that might bounce us into a higher priced single family with a yard. The housing market has not cooperated with our plans. The house was built somewhere between 1880 and 1890.

Entry and Dining Room - 1st Floor


I love the color of this room and my curtains. They will likely change all that. We never bought a real dining room set for this house because we have been planning on moving since we bought the place. I bought some really old dining room chairs from a yard sale. Worst yard sale buy ever! They all immediately broke, but I still keep them and make people sit lightly on them for dinner. Also got the piano for free on craigslist.org. Love the piano but it really doesn't have a great home in this house.

Kitchen - 1st Floor


Brand new counters coming soon! We gutted and redid this kitchen but it was really hard to lay out. Being as old as the house is, there are no square corners. There is an old chimney that runs up through the house that really threw off our room shapes. The chimney is behind our fridge, that is why it is in the middle of the kitchen. We stumped the team at Home Depot that lays out kitchens. Let's see if the Sell This House team can make it better. I also like the color I picked here too, Corn Husk Green. There is also a half bath off the kitchen, no pictures.


Living Room - 1st Floor


The children have taken over this room. It is crazy! The carpet is a huge area rug we put over the hardwood when the boys were babies. Easier for a baby to crawl around on carpet then cold hardwood. Figure the show will surely roll up the rug.

Master Bedroom - 2nd Floor


It is so small! Our furniture looks huge, but it is the "city scale" furniture, that means apartment size. The closets are too small for a standard hanger so we can't close the door. They show's producers said they found our closet problem fascinating. Fascinating is not what we call it, looking forward to seeing what they do in here.

Nursery - 2nd Floor

This room is smaller than a prison cell. It is 8X9, I am pretty sure prisoners get 10X10. I don't think the show will touch this room, but we will probably pull the ottoman out and the changing table for better showings. This is our 4th bedroom, but we can't list that way, it doesn't have a closet so it isn't a legal bedroom.

There is also a full bath on the 2nd floor, no picture, I don't think the show does bathrooms. It is all new though, very nice.

2nd Bedroom - 3rd Floor


This was our office till we moved a little boy up there about 6 months ago. Just got bunk beds about a month ago, won't bunk them for several years though. The 3rd floor bedrooms are really pretty large. Though they are attic rooms, they have full ceilings and are very functional. We are pretty sure the attic has always been finished as rooms. We found a really old picture in the wall here when we were renovating. A group of people from the turn of the century sitting in front of the house. Very cool.

3rd Bedroom - 3rd Floor


This is our guest room, however it has yet to recover from the arrival of the bunk beds. A lot of furniture has been shoved into this room, it is really the catch all room. We haven't had any house guests since Christmas so it has really had time to get out of hand. What a mess!

So excited and scared to see what they do to the house. Hope it is a fun adventure!